

OK. I decided to do the 42,000 3 year service myself after being quoted £370 
I changed oil, oil filter, fuel filter, air filter. This is how i did it:-
1. Buy parts. I get mine at trade cost, £60 all in.
2. Get the car warm, take it for a 15 minute run so the oil is nice and hot.
3. Jack the front of the car up, support on axle stands and remove the bottom cover (torque screws and 10mm nuts)
Oil and filter change
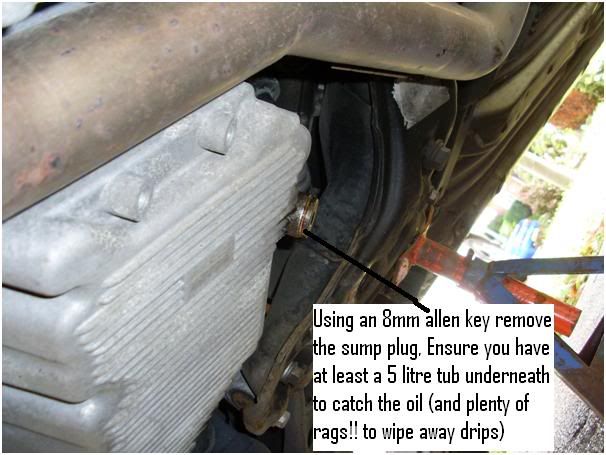
4. Using an 8mm allen key drain the oil into a tub.
![Image]()
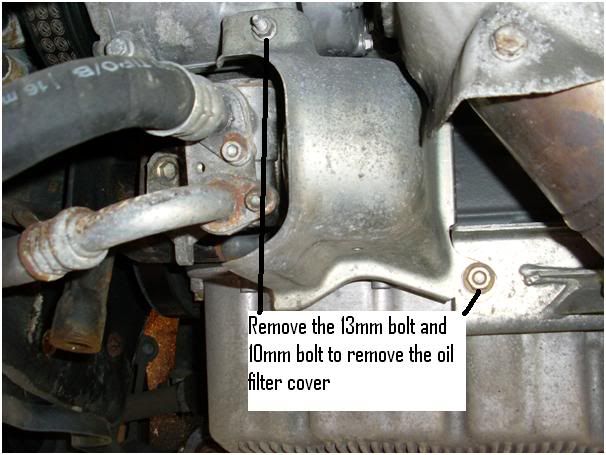
5. Remove oil filter cover
![Image]()
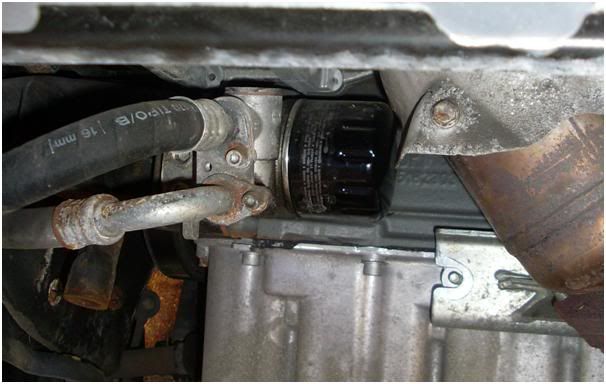
6. Remove oil filter - ensure you have a tub underneath to collect oil spillage
![Image]()
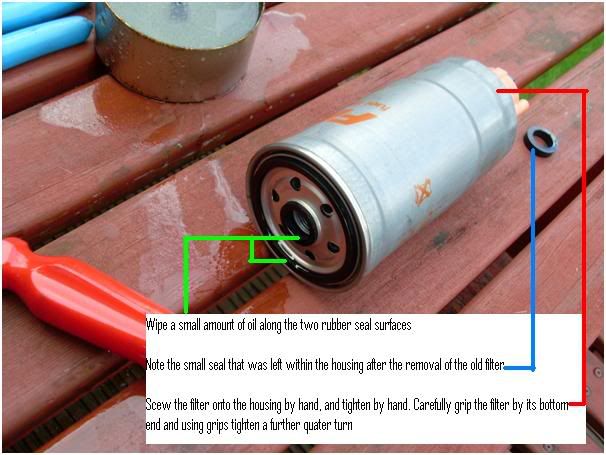
7. Smear clean oil around the new oil filter seal, tighten by hand and using a filter wrench (or gently with grips) tighten a further quarter of a turn
8. Resecure sump plug - do not overtighten.
9. Refill oil using correct grade oil, I put 4.25L of oil back in, checked it on dip stick (it showed 3/4 full) then ran it. Topped up to correct level next day to get an accurate level - do not overfill!
10. Check for leaks!
Fuel Filter Change
1. Remove engine cover
![Image]()
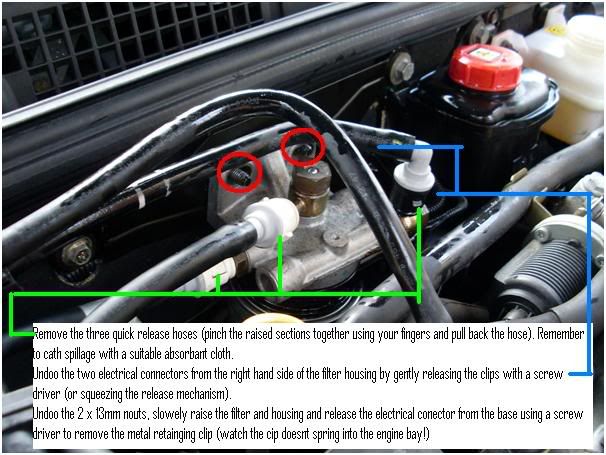
2. Remove the quick release fuel pipes and electrical connectors from the filter housing. NOTE: - there is an electrical connector on the base of the filter. Be carefull not to yank the unit upwards when removing.
![Image]()
3. Seperate the filter from the housing
![Image]()
4. Oil up the seals and replace the new filter
![Image]()
5. Reconnect all the pipes and electricals
6. Wipe away any fuel spillages.
7. Start the car (it will start after a few turns while the filter self primes) and check for leaks
Air filter change
1. As above remove the engine cover, jack up and support the car and remove the bottom cover
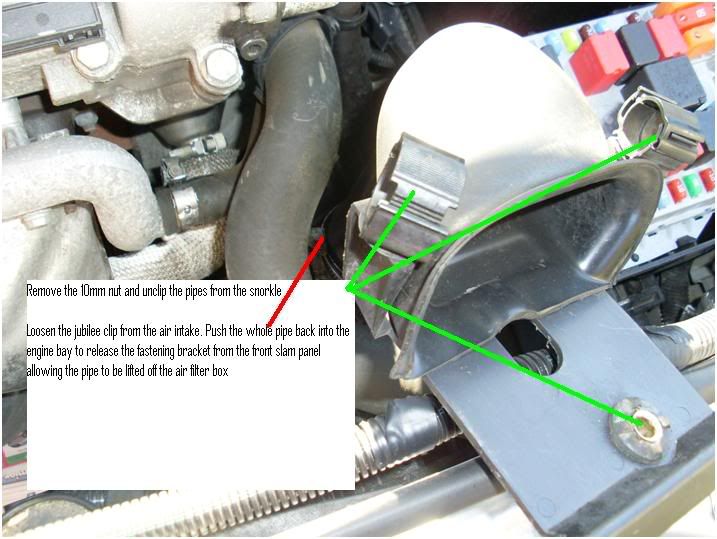
2. Working on top of the engine remove the snorkle intake
![Image]()
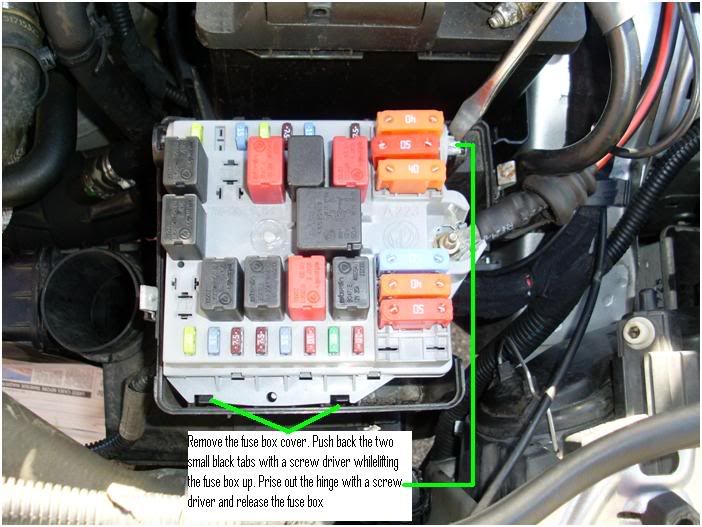
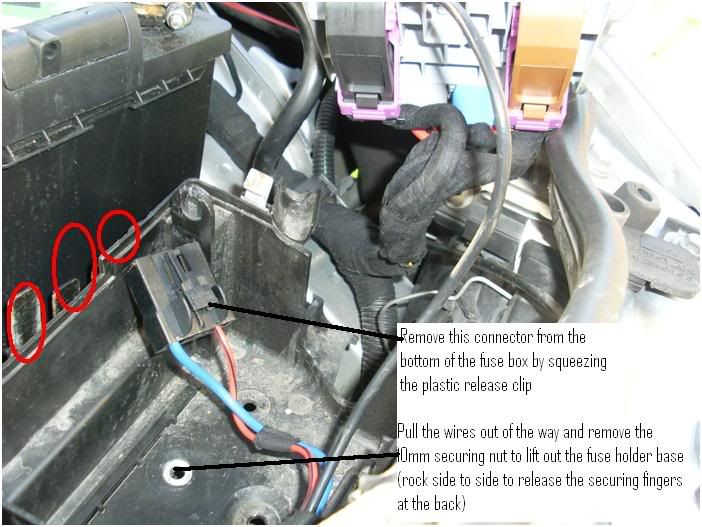
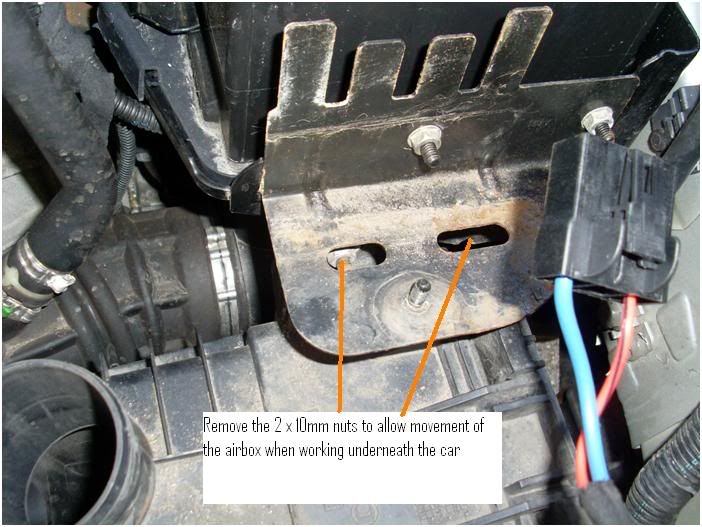
3. To gain better movement of the air box I also removed the fuse box and fuse box base
![Image]()
![Image]()
![Image]()
4. Working under the car, lift the box out of the bottom bracket (or pull the braket down gently to release) undo the two air filter box securing clasps, open the box and pull out the filter - Watch out for debris falling into your eyes!
5. Open the box at the bottom as wide as possible and feed in the new filter (sorry no pics). The filter should sit in very easily. Close the box and re-secure the fastening clips.
6. Reconnect all the bits in reverse order.
It took me 2 hours to complete all of the above, very straight forward. Hope this helps some of you save a few quid, obviously there may be easier ways to do this, and of course you attempt this at your own risk. The only thing I cannot do is reset the service light so I suppose I will have to get that sorted now.:thumbs:
I changed oil, oil filter, fuel filter, air filter. This is how i did it:-
1. Buy parts. I get mine at trade cost, £60 all in.
2. Get the car warm, take it for a 15 minute run so the oil is nice and hot.
3. Jack the front of the car up, support on axle stands and remove the bottom cover (torque screws and 10mm nuts)
Oil and filter change
4. Using an 8mm allen key drain the oil into a tub.
5. Remove oil filter cover
6. Remove oil filter - ensure you have a tub underneath to collect oil spillage
7. Smear clean oil around the new oil filter seal, tighten by hand and using a filter wrench (or gently with grips) tighten a further quarter of a turn
8. Resecure sump plug - do not overtighten.
9. Refill oil using correct grade oil, I put 4.25L of oil back in, checked it on dip stick (it showed 3/4 full) then ran it. Topped up to correct level next day to get an accurate level - do not overfill!
10. Check for leaks!
Fuel Filter Change
1. Remove engine cover

2. Remove the quick release fuel pipes and electrical connectors from the filter housing. NOTE: - there is an electrical connector on the base of the filter. Be carefull not to yank the unit upwards when removing.
3. Seperate the filter from the housing

4. Oil up the seals and replace the new filter
5. Reconnect all the pipes and electricals
6. Wipe away any fuel spillages.
7. Start the car (it will start after a few turns while the filter self primes) and check for leaks
Air filter change
1. As above remove the engine cover, jack up and support the car and remove the bottom cover
2. Working on top of the engine remove the snorkle intake
3. To gain better movement of the air box I also removed the fuse box and fuse box base
4. Working under the car, lift the box out of the bottom bracket (or pull the braket down gently to release) undo the two air filter box securing clasps, open the box and pull out the filter - Watch out for debris falling into your eyes!
5. Open the box at the bottom as wide as possible and feed in the new filter (sorry no pics). The filter should sit in very easily. Close the box and re-secure the fastening clips.
6. Reconnect all the bits in reverse order.
It took me 2 hours to complete all of the above, very straight forward. Hope this helps some of you save a few quid, obviously there may be easier ways to do this, and of course you attempt this at your own risk. The only thing I cannot do is reset the service light
so I suppose I will have to get that sorted now.:thumbs:

